FLOATING CLICK INSTALLATION INSTRUCTIONS (LAMINATE ONLY)

For use with Laminate Floors only.


Inspect the job site carefully before you begin the installation. Some conditions require specific installation methods. A level, flat, clean, dry, and firm subfloor is always necessary. All L.W. Mountain, Inc. products are manufactured in accordance with accepted industry standards. If the material is not acceptable, do not install it and contact the seller immediately.

Climate and Pre-installation Procedures
• Material should be stored on the job site in rooms where installation is to occur.
• Garages and exterior patios are not suitable for storing laminate flooring.
• DO NOT remove the product from the cartons.
• DO NOT open just the ends of the cartons.
• HVAC systems MUST be installed and operating before the flooring is delivered to the jobsite.
• All concrete, masonry, framing members, drywall, paint and other “wet” work should be thoroughly dry.
• Exterior Grading should be complete with surface drainage offering a minimum drop of 3’ in 10’.
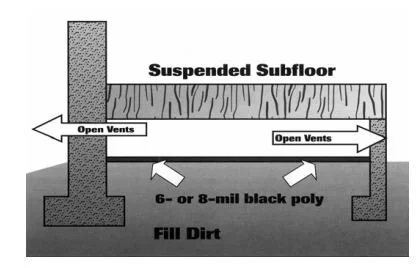
• Crawl spaces must be a minimum of 24” from the ground to the underside of the joists. A ground cover of 6-8 mil black polyethylene film is essential as a vapor barrier with joints lapped six inches and taped. The crawl space should have perimeter venting equal to 1.5% of the crawl space square footage.


***
CAUTION: Do not install LWM Laminate flooring over carpet. This product is not suitable for any outside use, solariums, sauna, or rooms that have the potential of flooding. We also highly recommend you do not install in rooms or homes that are not temperature controlled.


Make sure the room environment is set at a normal living range 55 – 80 degrees and 35 – 55% humidity.
Normal living conditions should be achieved and maintained a minimum of fourteen days before flooring is brought into the living area for acclimation purposes. It should be maintained during and after the installation as well. Allow the laminate planks to lay flat in unopened cartons, at least two feet from walls where they will be installed, for at least 48 hours before starting the installation. In very dry or very humid climates, allow 96hours (4 days). Moisture content of the subfloor should be 6-12% depending on your area.
The customer is responsible for maintaining normal humidity conditions (35-55%) within the home throughout the year. L.W. Mountain, Inc. is not responsible for environmental conditions that cause excessive expansion and contraction.


Appropriate Subfloors
1. Preferred Subfloor
1. ¾ inch CDX plywood in 4 x 8-foot sheets
2. ¾ inch OSB - PS2 rated in 4 x 8-foot sheets
2. Existing wood floors
3. Sheet vinyl or resilient tile as long as it is installed over one of the preferred subfloors. WARNING! DO NOT SAND, DRY SWEEP, DRY SCRAPE, DRILL, SAW, BEADBLAST OR MECHANICALLY CHIP OR PULVERIZE EXISTING RESILIENT FLOORING, BACKING, LINING FELT, ASPHALTIC "CUTBACK" ADHESIVES OR OTHER ADHESIVES. These products may contain either asbestos fibers and/or crystalline silica. Avoid creating dust. Inhalation of such dust is a cancer and respiratory tract hazard. Smoking by individuals exposed to asbestos fibers greatly increases the risk of serious bodily harm. Unless positively certain that the product is a non-asbestos-containing material, you must presume it contains asbestos. Regulations may require that the material be tested to determine asbestos content and may govern the removal and disposal of material. See current edition of the Resilient Floor Covering Institute (RFCI) publication Recommended Work Practices for Removal of Resilient Floor Coverings for detailed information and instructions on removing all resilient covering structures. For current information go to www.rfci.com
4. Ceramic tiles should be made smooth by applying a cementitious overlay such as patching or levelling compound.
5. Concrete slabs – Concrete subfloors must be cured for a minimum of 30 days. The moisture content of a concrete subfloor should be tested using a Calcium Chloride test (ASTM-F-1869 or ASTM F-710) and show no greater than 3 pounds per 1000 square feet in 24 hours or in accordance with ASTM F2170 latest version RH in-situ probe.
6. In-floor Radiant Heat: With radiant heat, heat source is directly beneath the flooring, so flooring may gain moisture or dry out faster than in a home with conventional heating system. For this installation, once slab has cured, turn heat on, regardless of season, and leave it on for at least 5-6 days before installation. Maximum surface temperature should never be more than 85 degrees Fahrenheit (30 degrees Celsius).
7. NEVER install a floating floor over another floating floor.


Subfloor Preparation
1. Subfloors must be cleaned. This can be scraping or sanding the floor to remove all foreign materials.
2. Subfloors must be flat. 3/16 inch in 10 feet. Sand all seams and high spots.
3. Subfloors must be free of loose areas and squeaks before installation can start. Renail or screw down sections that are loose or squeak. Replace any subfloor that is damaged.
4. The subfloor must be dry before you begin your installation.

Above Grade- Engineered and Solid floors can be installed.
On Grade- Engineered and Solid floors can be installed. L.W. Mountain. Inc. does not recommend gluing down solid wood on concrete slabs. Solid Bamboo can be glued with appropriate adhesives. *See Technical Letter*
Below Grade- Engineered floors can be installed. Solid wood and bamboo should not be installed below grade.

INSTALLATION

Important Notice
The installer is the final inspector of this product. If the installer is not sure whether or not the floor’s milling or grading is acceptable, work should stop immediately, and a call should be made to the person that sold the floor.

Floating – Click Joint Method
Maximum room dimensions for laminate floating floors are 25ft. across the boards or 40 ft. lengthwise. Floors exceeding either of these dimensions require use of “T-Molding”. “T-Molding” should be installed in any doorway connecting to larger areas of flooring. A minimum of one butt seam is required in every other row, regardless of width (e.g. hallways).
Never attach any permanent object through the flooring, affixing it to the subfloor. Never install cabinets on top of floating floors. A floating floor must be free to expand and contract in all directions.

NOTE: LWM Laminate with pre-attached backing does not require additional underlayment

Step 1
If installing over below-grade concrete, a 6 mil plastic moisture barrier MUST be laid over entire subfloor before any other underlayments. Overlap plastic seams 8 inches.
Step 2
Begin installation from the longest straightest wall, usually an outside wall. Start in the corner and lay first row, with tongue ends and sides toward wall. Proper expansion space can be achieved by pulling floor away from wall once first three rows have been installed. Use spacers to maintain a proper expansion space of ½ inch.
Step 3
Engage tongue of next board into groove of previous board by holding it against the first board at approx. 45º angle and laying it flat on the floor. Continue in this manner for entire first row.
Step 4
Cut end board in first row to correct length and start second row with left-over piece (if possible). End joints should be staggered by at least twice the width of the plank. Butt seam must be placed in each row regardless of width, e.g. hallways. Do not use stair step spacing. Avoid End-Joint line up & H joints. See Figure A-1


Step 5
Engage tongue of next board into groove of previous boards by holding the board at approx. 45º angle to the previous boards. Press forward to engage joint and lay flat on floor.
Step 6
Engage short end of new board. Lay flat, keeping long side in line with groove of adjacent board.
Step 7
Using tapping block, carefully tap long edges together until they are closed. DO NOT tap too hard or over-engage. Never tap directly against wear layer. Continue this process until you reach the end wall.
Step 8
Cut last board to correct width. Place last board on top of second-to-last board. Mark board with help of piece of board without locking edge. Use floor pull bar and mallet to click the long side of planks.

NOTE: If boards cannot be easily angled under door frame (or similar), do the following: cut away locking edge, then apply Floating Floor Adhesive and install board.


Remember that all walls and other vertical structures in the room must have a ½ inch expansion space left between it and the floor. If your drywall stops at least ¾” above the floor, the thickness of the drywall can be considered part of the ½ inch expansion space requirement.
• Once the floor has been completed the base and the quarter round can be reinstalled into the room. This will cover the expansion gaps left between the wall and the floor.
• Sweep or vacuum the floor using a soft brush attachment.
• Finish by cleaning the floor with an approved hardwood floor cleaner.
• Enjoy your new hard wood floor.


TRIMS & TRANSITIONS
There is a variety of trims and transitions to accent a floor by covering expansion gaps or transitioning from one flooring surface to another. Before completing your floor, it is important to know what trim pieces you will need for your floor.


• T-Mold
- The molding is used mostly between tiled surfaces and wood floors. Also used for connecting to existing wood floors.
• Overlap Reducer- Used with floors to other floor coverings with lower vertical heights. Also used to transition to carpet.
• Overlap Stairnose- Used to transition for step down and staircases.
• Quarter Round- Used to cover expansion around walls next to base boards

Moldings must always be glued or nailed to the wall or subfloor, never to the laminate flooring

Additional Information

Waste Factor :
Additional square footage ordered for an installation is commonly referred to as a waste factor. During installation, boards are cut to specifically fit your floor. In addition, some boards may not be suitable for installation because of milling or color preferences which means it becomes waste. Finally, unfortunate damage during the life of your floor may call for replacing a board, and having spare flooring from the same stock can help to keep your floor’s appearance. The standard in the flooring industry is to order five - ten percent of additional flooring to cover cuts and other waste.

POST INSTALLATION

*DO NOT INSTALL CABINETS ON TOP OF ANY FLOATING FLOOR. IT WILL INHIBIT THE EXPANSION AND CONTRACTION OF THE FLOOR.
**L.W. Mountain, Inc. does not recommend covering the flooring for any extended period. If covering is needed to protect the flooring from additional work, it should be immediately uncovered after the work is performed. Covering the flooring can give other trades the perception that no damage will occur no matter what they do. In addition, foreign matter between the flooring and the cover can cause abrasions to the surface.

This is especially true in NEW home construction. Covering a newly installed floor over a recently poured concrete basement with fresh paint and dry-wall can cause moisture to be trapped under the covering and causing major damage to the new flooring

DOWNLOAD A PRINTER-FRIENDLY VERSION HERE!

Next
Next

FLOOR CARE AND PRODUCT WARRANTY GUIDE FOR COMMERCIAL DRY-BACK LUXURY VINYL